Key takeaways
- Levels matter when they are obvious, recent enough, and tied to real structure or repeated reaction.
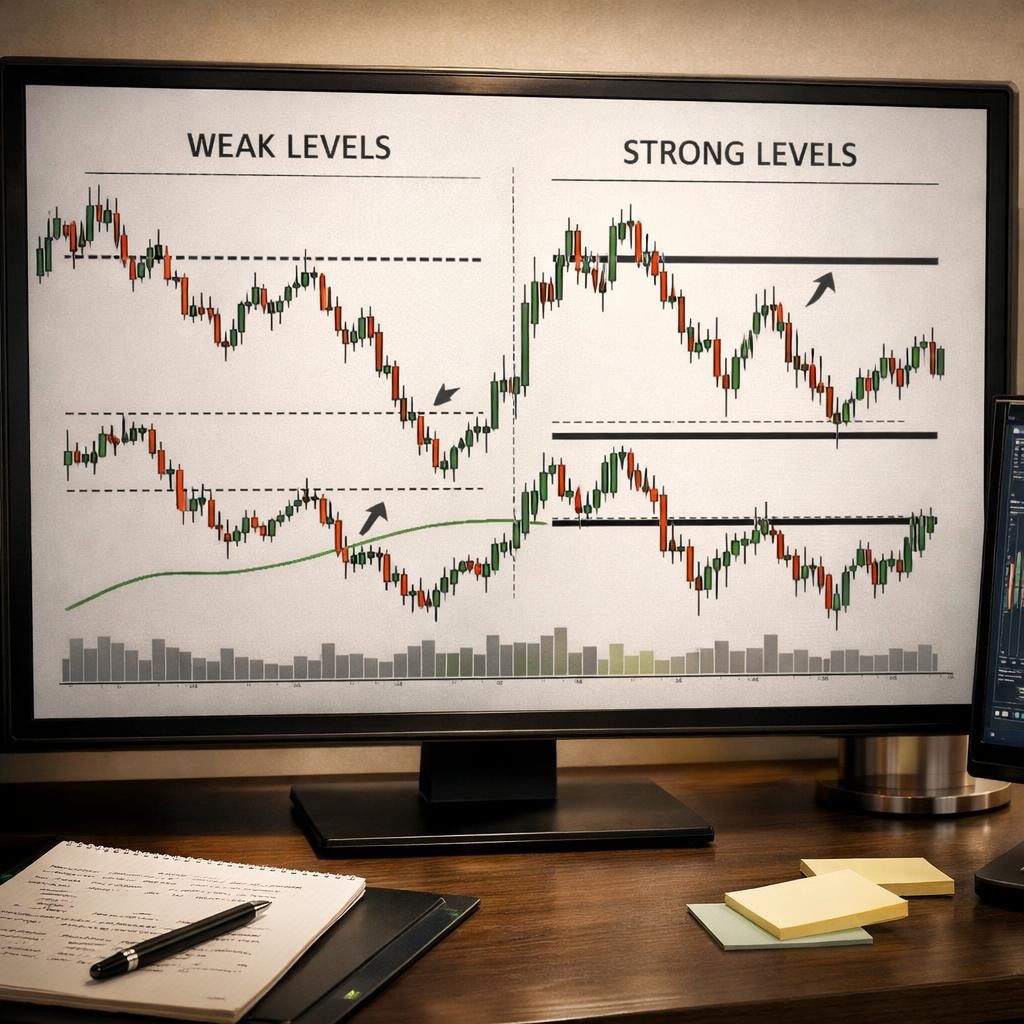
- The more levels on the chart, the less useful each one becomes.
- Start from higher timeframe structure and mark the few levels that would actually change your plan.
- A major way traders lose edge is marking every local swing as a level.
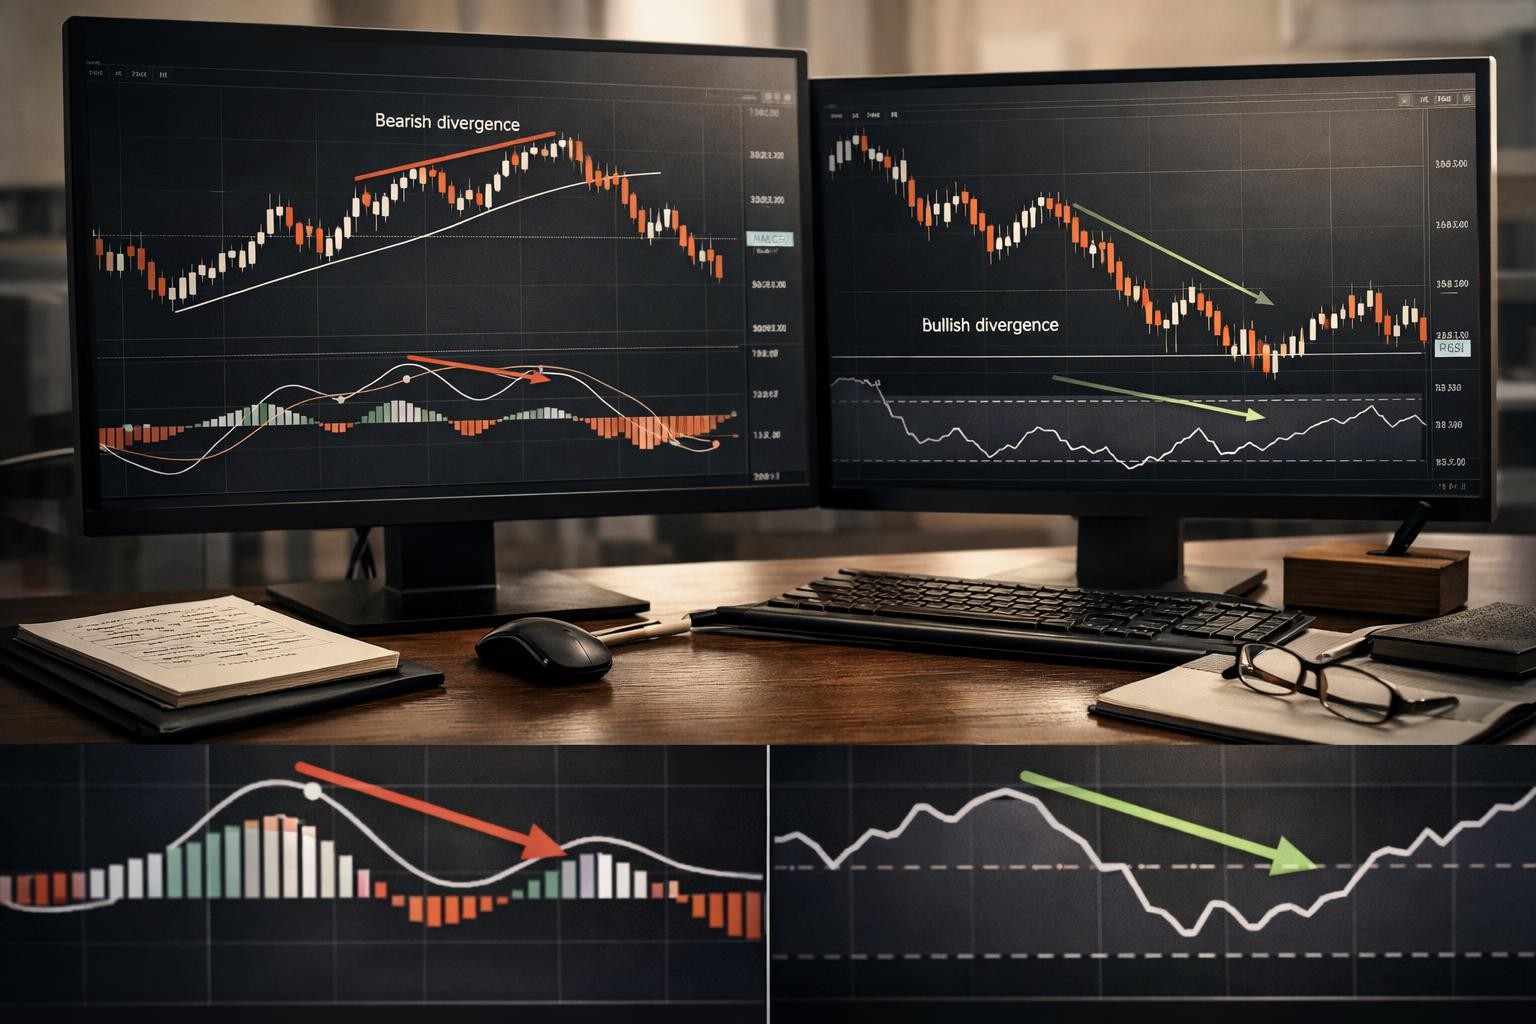
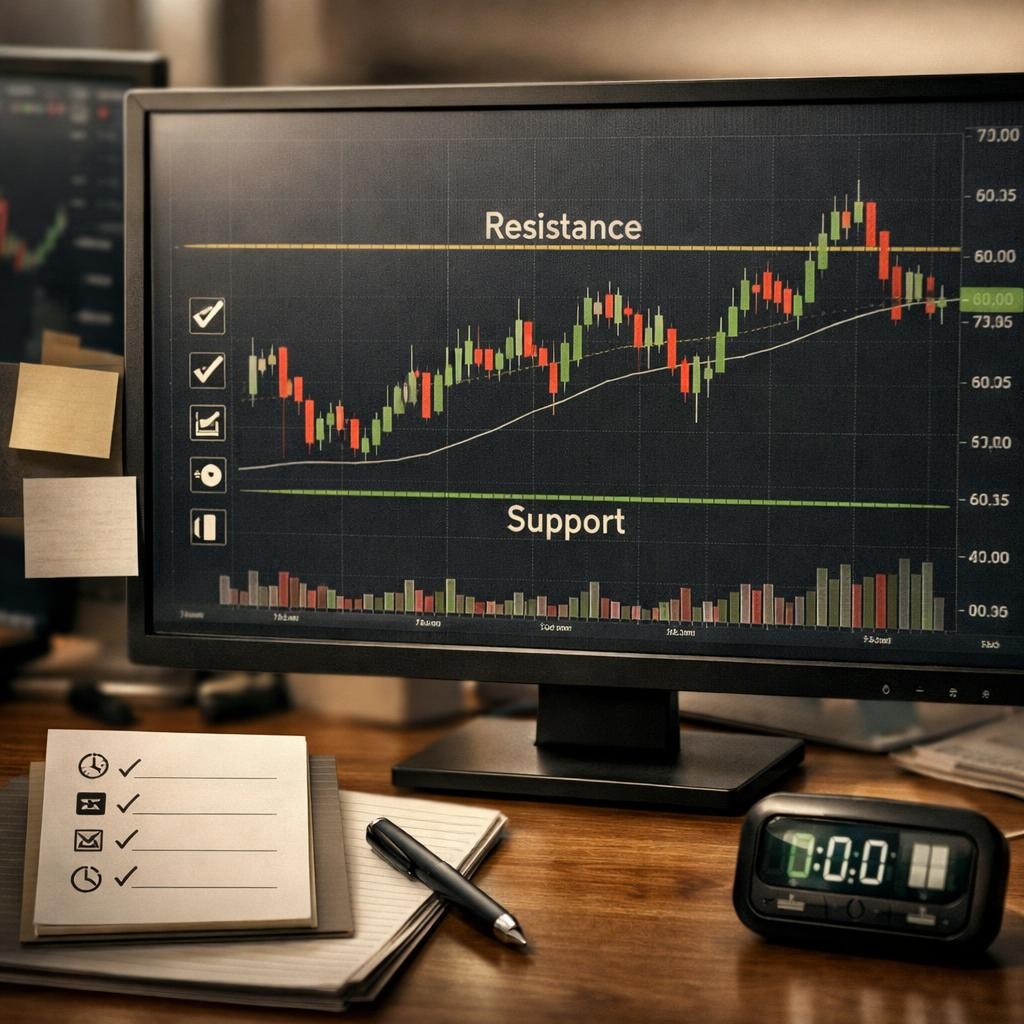
Support and resistance are decision zones created by prior acceptance, rejection, or trapped inventory. The useful version is not drawing every pivot; it is marking the levels that still change the trade. For active traders, that matters because support and resistance usually breaks down when the chart idea and the decision process drift apart. The goal is not to romanticize the concept. The goal is to make it specific enough that a trader can recognize the right environment, define the invalidation point, and explain afterward why the setup was or was not worth taking. Readers want a cleaner process for selecting actionable levels instead of cluttering every chart. A clean workflow starts by separating the job of the concept from the noise around it. Support and resistance should answer a practical question before the trade, during the trade, and after the trade. If the trader cannot state that question clearly, the setup will usually get bent by emotion, late entries, or hindsight once the market gets fast.
Throughout this guide, the focus stays on the parts that actually move the outcome: levels, structure, and chart clutter. Those details matter more than slogans because they determine whether the idea survives real execution pressure or collapses into a story that only sounds coherent after the fact.
What support and resistance actually means in live trading
In live trading, support and resistance should function as a decision aid rather than a decorative label. The concept earns its place when it helps the trader understand location, define what must happen next, and recognize when the premise no longer deserves capital.
Support and resistance gets misused when traders treat support and resistance trading, key levels intraday, chart clutter, and level reaction as separate ideas instead of linked parts of the same process. A coherent workflow ties those pieces together so the trader knows what the market is saying, what qualifies as confirmation, and what would prove the setup wrong.
Why traders struggle with support and resistance
Most traders struggle here because the concept sounds cleaner in hindsight than it feels in a fast market. The tension usually comes from one of two problems: the concept is defined too loosely, or the trader keeps expanding the number of acceptable interpretations once the market starts moving. Either way, the setup stops being a framework and starts becoming a negotiation.
The fix is to tighten the definition until it can survive a fast tape. A strong explanation of support and resistance should tell the trader what deserves attention, what should be ignored, and what evidence changes the trade from “interesting” to “actionable.” If the rule only makes sense on a screenshot after the move, it is still too vague.
Core principles that make support and resistance useful
The strongest version of this topic is not built on one signal. It is built on a handful of principles that keep the concept honest when the chart is noisy or the workflow is under pressure.
Principle 1
One of the core rules behind support and resistance is simple but easy to violate: Levels matter when they are obvious, recent enough, and tied to real structure or repeated reaction. The market does not reward the trader for knowing the phrase. It rewards the trader for applying levels matter when they are obvious, recent enough, and tied to real structure or repeated reaction consistently enough that entries, exits, and skips come from the same logic. A principle earns its place only when it changes the trade management decisions around levels matter when they are obvious. If that idea does not alter location, timing, size, or patience on a live chart when price is moving, accepting, rejecting, or rotating around the area that matters, it is probably being treated like a talking point instead of a trading rule. A practical way to audit this principle is to ask whether levels matter when they are obvious would still be visible to another disciplined trader looking at the same session. If the answer around that idea depends on private interpretation, the concept still needs a tighter definition.
Principle 2
The first thing to understand here is straightforward: The more levels on the chart, the less useful each one becomes. Traders often nod at the more levels on the chart and then ignore the operating implication. In practice, support and resistance only helps when the trader uses the more levels on the chart to reduce uncertainty rather than add another interpretation layer. That is why the more levels on the chart has to be visible in levels, structure, and chart clutter, not only in theory. When the trader reviews how the more levels on the chart behaved, the rule should explain what deserved attention, what changed the risk profile, and what should have been ignored on a live chart when price is moving, accepting, rejecting, or rotating around the area that matters. The principle becomes genuinely useful when the trader can connect the more levels on the chart to a concrete action: wait, engage, reduce size, or stand aside. That connection around the more levels on the chart is what turns knowledge into a trading edge instead of a post-trade explanation.
Principle 3
One of the core rules behind support and resistance is simple but easy to violate: Higher timeframe levels usually deserve more respect than minor intraday noise. The market does not reward the trader for knowing the phrase. It rewards the trader for applying higher timeframe levels usually deserve more respect than minor intraday noise consistently enough that entries, exits, and skips come from the same logic. A principle earns its place only when it changes the trade management decisions around higher timeframe levels usually deserve more respect than minor intraday. If that idea does not alter location, timing, size, or patience on a live chart when price is moving, accepting, rejecting, or rotating around the area that matters, it is probably being treated like a talking point instead of a trading rule. A practical way to audit this principle is to ask whether higher timeframe levels usually deserve more respect than minor intraday would still be visible to another disciplined trader looking at the same session. If the answer around that idea depends on private interpretation, the concept still needs a tighter definition.
Principle 4
The first thing to understand here is straightforward: A level is a location for a decision, not a guaranteed reversal point. Traders often nod at a level is a location for a decision and then ignore the operating implication. In practice, support and resistance only helps when the trader uses a level is a location for a decision to reduce uncertainty rather than add another interpretation layer. That is why a level is a location for a decision has to be visible in levels, structure, and chart clutter, not only in theory. When the trader reviews how a level is a location for a decision behaved, the rule should explain what deserved attention, what changed the risk profile, and what should have been ignored on a live chart when price is moving, accepting, rejecting, or rotating around the area that matters. The principle becomes genuinely useful when the trader can connect a level is a location for a decision to a concrete action: wait, engage, reduce size, or stand aside. That connection around a level is a location for a decision is what turns knowledge into a trading edge instead of a post-trade explanation.
How to apply support and resistance before the trade
Application should begin before entry is even possible. This is where the trader turns the concept into a routine that narrows the trade instead of merely decorating the chart.
Step 1
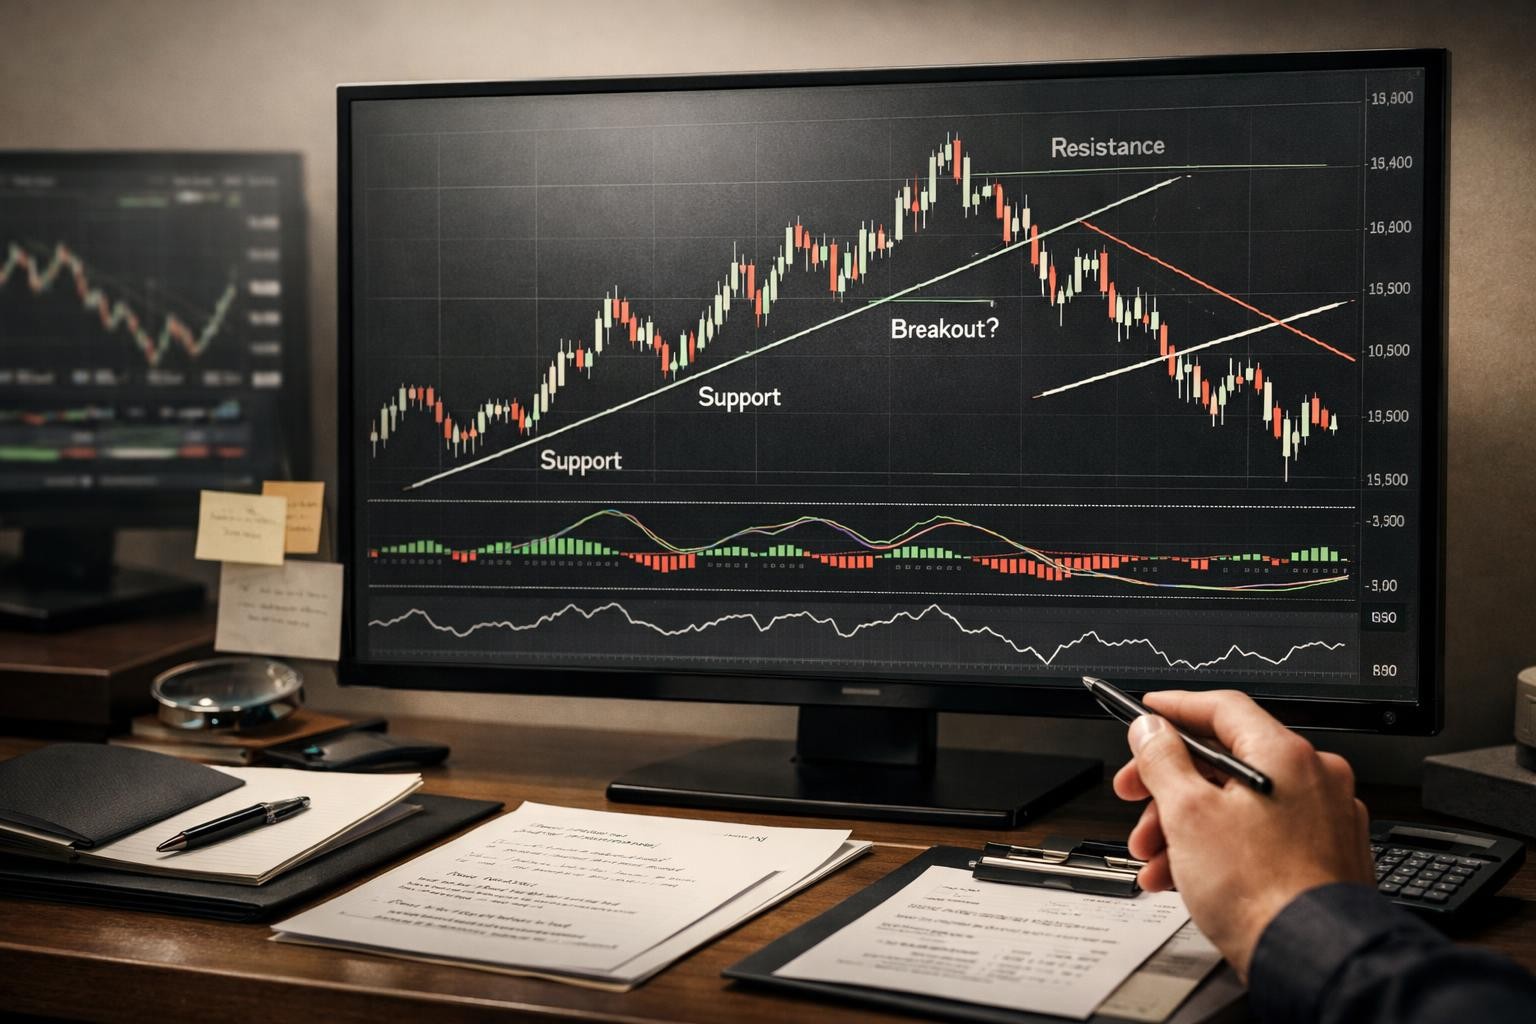
A repeatable process around support and resistance usually depends on one concrete behavior: Start from higher timeframe structure and mark the few levels that would actually change your plan. Without start from higher timeframe structure and mark the few levels, the setup stays too dependent on feel, and feel changes quickly once the session starts printing faster than the trader can narrate. Notice what this step does operationally: it turns start from higher timeframe structure and mark the few levels into a filter. That filter should help the trader say yes faster to the right setup, no faster to the wrong one, and stay flat when the chart is technically active but structurally unhelpful. In practice, this means the trader should be able to point to evidence before entry and say why start from higher timeframe structure and mark the few levels supports the trade now rather than five bars later. That timestamp discipline is what keeps late entries and narrative drift under control.
Step 2
The process becomes practical at this stage: Differentiate between major levels and minor intraday references. That wording matters because it forces the trader to do the work before the trade, when there is still time to define the environment, the trigger, and the invalidation level clearly. This is also where many traders discover whether the topic is actually usable in their own workflow. A strong step narrows the number of acceptable trades, clarifies what the market has to prove next around differentiate between major levels and minor intraday references, and reduces the temptation to keep bargaining with the chart after the premise has weakened. The value of the step shows up in the skip decisions too. If differentiate between major levels and minor intraday references is missing, weak, or late, the process should make it easier to stay flat instead of turning every near-miss into a rationalized trade.
Step 3
A repeatable process around support and resistance usually depends on one concrete behavior: Wait for behavior at the level rather than assuming the level alone is enough. Without wait for behavior at the level rather than assuming the, the setup stays too dependent on feel, and feel changes quickly once the session starts printing faster than the trader can narrate. Notice what this step does operationally: it turns wait for behavior at the level rather than assuming the into a filter. That filter should help the trader say yes faster to the right setup, no faster to the wrong one, and stay flat when the chart is technically active but structurally unhelpful. In practice, this means the trader should be able to point to evidence before entry and say why wait for behavior at the level rather than assuming the supports the trade now rather than five bars later. That timestamp discipline is what keeps late entries and narrative drift under control.
Example walkthrough: Support and resistance for active traders: how to mark usable levels without cluttering the chart
Examples matter because they reveal the order of decisions. The chart may move quickly, but the logic still needs to answer the same sequence of questions every time.
Example step 1
Consider how this would look in the middle of a real session: A trader marks the prior day high, prior day low, and a higher timeframe balance edge before the session That example matters because it shows what a trader marks the prior day high looks like when the concept is doing actual work instead of living as a definition beside the chart. The value of a walkthrough is that it exposes decision order around a trader marks the prior day high. The trader has to decide what matters first, what is only supportive context, and what should cancel the trade. That order is what keeps the concept coherent under real pressure. Examples like this also reveal where patience belongs. If the confirming evidence never arrives after a trader marks the prior day high, the trader still learns something valuable: the concept gave location, but it never gave permission.
Example step 2
A realistic walkthrough helps because live trading does not arrive as a neat checklist item. When price approaches one of those levels, the trader watches for acceptance, rejection, or failed breakout behavior In a real session, that moment forces the trader to connect the concept to location, timing, and the quality of the immediate response instead of relying on a clean hindsight screenshot. The key question is what the trader does next after when price approaches one of those levels. Good examples are not about predicting every tick. They are about showing what evidence increases conviction, what evidence invalidates the idea, and how the trader keeps risk aligned with the original premise instead of the hope of a larger move. This is why walkthroughs should end with a decision, not a lecture. After when price approaches one of those levels, the trader either has a cleaner trade, a cleaner skip, or a clearer invalidation. All three are useful outcomes when the process is honest.
Example step 3
Consider how this would look in the middle of a real session: The trade is based on how price behaves at the level, not on the level existing by itself That example matters because it shows what the trade is based on how price behaves at the looks like when the concept is doing actual work instead of living as a definition beside the chart. The value of a walkthrough is that it exposes decision order around the trade is based on how price behaves at the. The trader has to decide what matters first, what is only supportive context, and what should cancel the trade. That order is what keeps the concept coherent under real pressure. Examples like this also reveal where patience belongs. If the confirming evidence never arrives after the trade is based on how price behaves at the, the trader still learns something valuable: the concept gave location, but it never gave permission.
Checklist before you trust support and resistance live
A checklist is valuable because it interrupts optimism. Before size goes on, the setup should pass a small number of hard gates that protect both the trade idea and the review process.
Checklist item 1
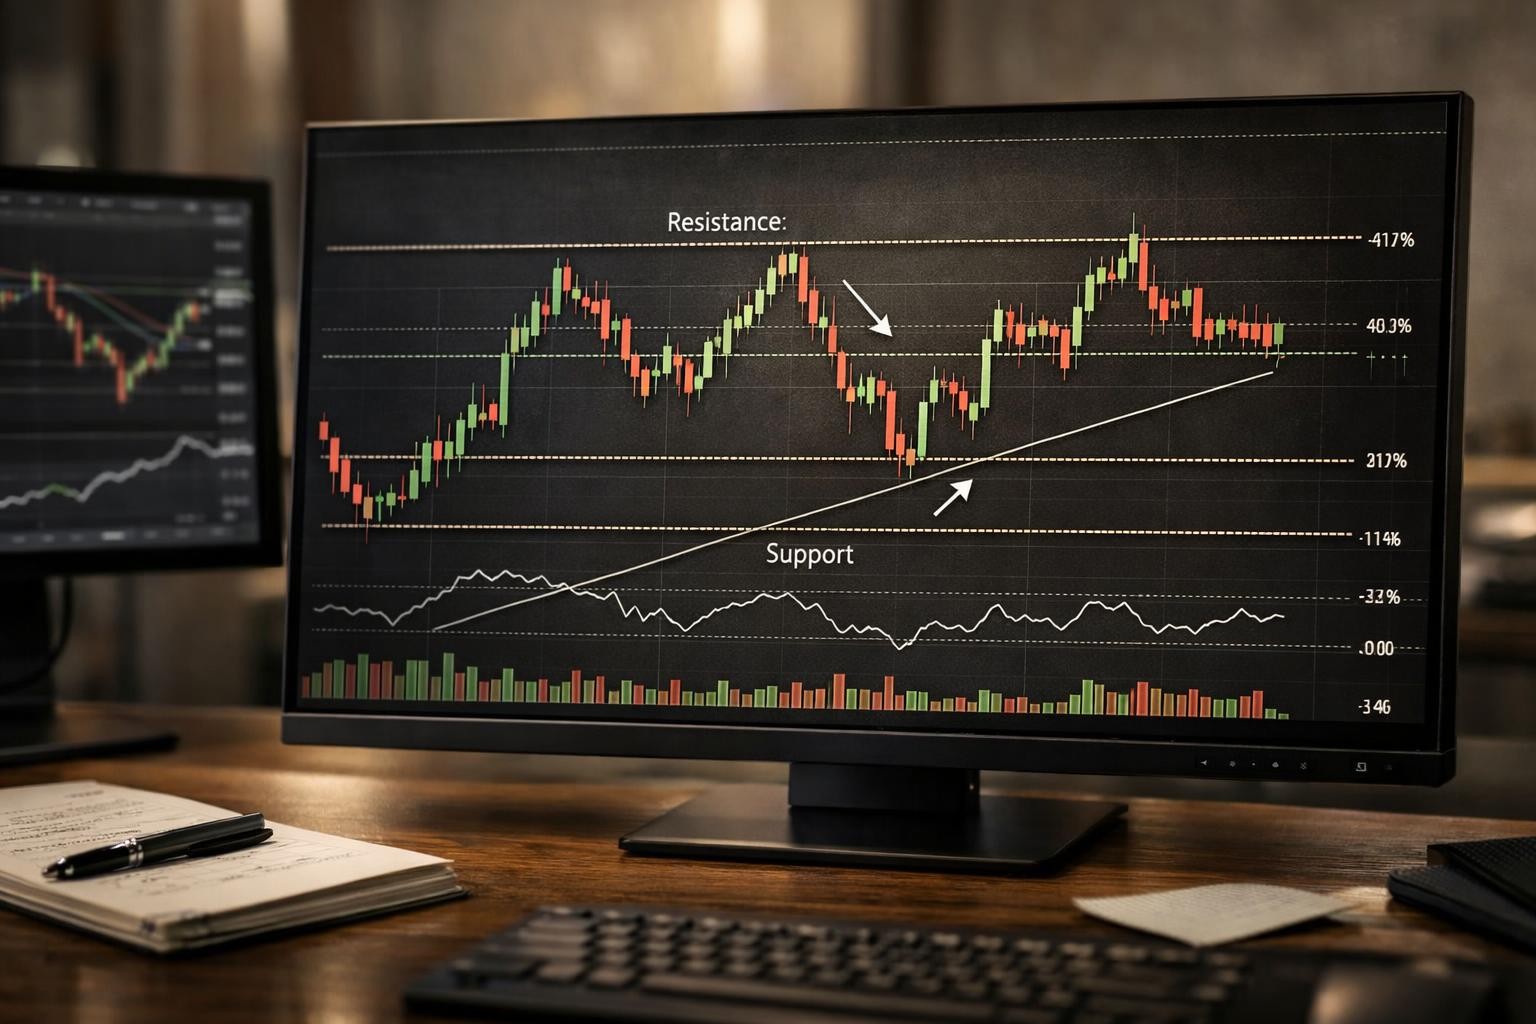
Use this checkpoint as a hard gate, not as a suggestion: Mark only the levels that change the plan. The point of the checklist is to stop weak trades around mark only the levels that change the plan early, when discipline is cheap, instead of depending on mid-trade willpower to correct a sloppy start. A strong checklist item also creates better review data. If mark only the levels that change the plan was fuzzy before entry, the trader should be able to see that on the journal page afterward rather than pretending the weak decision came from bad luck alone. Checklist discipline around mark only the levels that change the plan matters because it protects the trader from acting on familiarity alone. When mark only the levels that change the plan is answered honestly, the trade either earns risk more clearly or gets filtered out before emotion has a chance to dress it up.
Checklist item 2
Before a setup deserves real risk, this checkpoint needs an honest answer: Separate higher timeframe levels from minor noise. Checklist items like separate higher timeframe levels from minor noise matter because they prevent the trader from treating confidence as proof. The trade is not ready simply because the chart looks familiar. When traders skip separate higher timeframe levels from minor noise, they usually compensate by adding interpretation later. A proper checklist does the opposite. It removes negotiation around separate higher timeframe levels from minor noise and keeps the process narrow enough that the post-trade review can tell whether the setup really followed the playbook. A checklist is not there to make the process feel restrictive. It is there to make sure separate higher timeframe levels from minor noise gets answered in the calm part of the decision, before price movement and urgency start rewriting the standard.
Checklist item 3
Use this checkpoint as a hard gate, not as a suggestion: Define what reaction confirms or rejects the level. The point of the checklist is to stop weak trades around define what reaction confirms or rejects the level early, when discipline is cheap, instead of depending on mid-trade willpower to correct a sloppy start. A strong checklist item also creates better review data. If define what reaction confirms or rejects the level was fuzzy before entry, the trader should be able to see that on the journal page afterward rather than pretending the weak decision came from bad luck alone. Checklist discipline around define what reaction confirms or rejects the level matters because it protects the trader from acting on familiarity alone. When define what reaction confirms or rejects the level is answered honestly, the trade either earns risk more clearly or gets filtered out before emotion has a chance to dress it up.
Checklist item 4
Before a setup deserves real risk, this checkpoint needs an honest answer: Use levels to shape risk, not to justify prediction. Checklist items like use levels to shape risk matter because they prevent the trader from treating confidence as proof. The trade is not ready simply because the chart looks familiar. When traders skip use levels to shape risk, they usually compensate by adding interpretation later. A proper checklist does the opposite. It removes negotiation around use levels to shape risk and keeps the process narrow enough that the post-trade review can tell whether the setup really followed the playbook. A checklist is not there to make the process feel restrictive. It is there to make sure use levels to shape risk gets answered in the calm part of the decision, before price movement and urgency start rewriting the standard.
Checklist item 5
Use this checkpoint as a hard gate, not as a suggestion: Remove stale lines that no longer matter. The point of the checklist is to stop weak trades around remove stale lines that no longer matter early, when discipline is cheap, instead of depending on mid-trade willpower to correct a sloppy start. A strong checklist item also creates better review data. If remove stale lines that no longer matter was fuzzy before entry, the trader should be able to see that on the journal page afterward rather than pretending the weak decision came from bad luck alone. Checklist discipline around remove stale lines that no longer matter matters because it protects the trader from acting on familiarity alone. When remove stale lines that no longer matter is answered honestly, the trade either earns risk more clearly or gets filtered out before emotion has a chance to dress it up.
Common mistakes and failure modes
Most losses around this topic do not come from not knowing the vocabulary. They come from letting the process bend under pressure. These failure modes are where the edge usually leaks out.
Failure mode 1
One of the more expensive mistakes around support and resistance is Marking every local swing as a level. Traders usually notice the loss or the frustration first, but the real damage starts earlier, when the process quietly stops respecting the original thesis. This is where review matters. If marking every local swing as a level keeps producing the same mistake, the answer is not another motivational note. The answer is to rewrite the process so the weak assumption becomes visible before capital is exposed. A good correction usually starts with one question: what should have blocked this trade earlier? When the trader can answer that clearly, the mistake stops being a vague frustration and becomes a concrete improvement item.
Failure mode 2
A recurring failure mode is easy to recognize once you know what to look for: Ignoring session context and treating all levels equally. The reason it persists is that it often produces a plausible explanation after the trade, even though it was already degrading the decision before the order was ever sent. The fix is usually less dramatic than traders expect. It means tightening the rule around ignoring session context and treating all levels equally, reducing the number of acceptable exceptions, and making the trade earn its way into the plan instead of being waved through because the idea sounded close enough. Most expensive habits survive because they are tolerated in “almost good enough” form. Naming exactly how ignoring session context and treating all levels equally distorts the setup makes it much easier to remove that habit from the playbook.
Failure mode 3
One of the more expensive mistakes around support and resistance is Entering at a level with no defined invalidation or reaction criteria. Traders usually notice the loss or the frustration first, but the real damage starts earlier, when the process quietly stops respecting the original thesis. This is where review matters. If entering at a level with no defined invalidation or reaction keeps producing the same mistake, the answer is not another motivational note. The answer is to rewrite the process so the weak assumption becomes visible before capital is exposed. A good correction usually starts with one question: what should have blocked this trade earlier? When the trader can answer that clearly, the mistake stops being a vague frustration and becomes a concrete improvement item.
Review questions after the session
The review loop is where the concept becomes durable. Good review work is not about defending the trade. It is about checking whether the decision chain behaved the way the playbook said it should.
Review question 1
The review loop becomes useful when it asks something concrete: Did the level matter before the trade or only after the fact. That question keeps the trader from grading the result alone and pushes the review back toward decision quality, risk discipline, and whether the plan stayed intact under pressure. This is also where patterns start to show up. If did the level matter before the trade or only after keeps producing the same weak answer across multiple sessions, the trader has found a process gap. That is the point where the playbook should change, not merely the self-talk. Strong reviews usually end with one actionable adjustment. If did the level matter before the trade or only after exposed a weak assumption, the follow-up should change the checklist, the trade filter, or the sizing rule before the next session begins.
Review question 2
After the session, this is the right question to ask: Was the chart cleaner after marking levels or more confusing. Review questions matter because they turn the topic back into observable behavior. A good answer should point to evidence on the chart, in the journal, or in the execution record. If the answer to was the chart cleaner after marking levels or more confusing is vague, the next revision should simplify the process rather than add another clever rule. Good review work reduces ambiguity. It does not reward the trader for inventing better explanations after the fact. This is how the concept compounds over time. Each honest answer to was the chart cleaner after marking levels or more confusing makes the process a little clearer, which means future trades depend less on memory and more on a standard that can actually be repeated.
Review question 3
The review loop becomes useful when it asks something concrete: How did price behave when it reached the level. That question keeps the trader from grading the result alone and pushes the review back toward decision quality, risk discipline, and whether the plan stayed intact under pressure. This is also where patterns start to show up. If how did price behave when it reached the level keeps producing the same weak answer across multiple sessions, the trader has found a process gap. That is the point where the playbook should change, not merely the self-talk. Strong reviews usually end with one actionable adjustment. If how did price behave when it reached the level exposed a weak assumption, the follow-up should change the checklist, the trade filter, or the sizing rule before the next session begins.
When support and resistance has less edge than traders think
Every useful concept has environments where it becomes weaker. Support and resistance tends to lose value when the trader forces it onto a market condition it was never meant to solve, or when the surrounding context no longer supports the original premise. Thin trade, messy rotations, late entries, and unclear invalidation all make the idea look simpler on paper than it feels in execution.
That does not mean the concept is broken. It means the trader has to know when it is functioning as primary evidence and when it is only supportive context. Many weak trades happen because the market has already moved too far, the location is no longer attractive, or the trader is using the concept as a reason to participate rather than a reason to filter.
This section is especially important for active traders because discipline is not just about taking good trades. It is also about passing on setups that technically fit the label but no longer offer clean location, clean risk, or clean follow-through. The concept stays valuable when the trader can say no without resentment.
Turning support and resistance into a repeatable playbook
A repeatable playbook starts with the simplest version of the idea that still captures the edge. The trader should be able to describe the setup, the no-trade conditions, the invalidation level, and the review standard in language that another disciplined operator could understand without being asked to guess what “looks good” means that day.
From there, improvement comes from review, not from piling on exceptions. If the same problem keeps appearing, tighten the rule or remove the condition that creates confusion. Good playbooks get clearer as they mature. They do not become more impressive by becoming harder to explain.
That is the real value of learning support and resistance well. The payoff is not only a better chart read or a cleaner entry. The payoff is a process that holds together from the opening plan to the post-trade review, which is what gives the concept staying power across many sessions rather than one memorable screenshot.
Bottom line
Support and resistance for active traders: how to mark usable levels without cluttering the chart should help the trader make better decisions, not tell a better story after the move. When the concept is defined clearly, applied in the right environment, pressure-tested with examples, and reviewed honestly, it becomes much more than a buzzword. It becomes a practical part of the trading process.
That is the standard worth aiming for. Understand what the concept measures, respect the conditions that make it useful, and keep the review loop tight enough that weak assumptions are exposed early. Traders who do that usually get more value from the topic because they are learning how to think with it, not just how to name it.
Frequently asked questions
How many support and resistance levels should be on the chart?
Usually only a handful. If every swing is marked, none of the levels meaningfully guide the decision.
Should traders enter at support or resistance automatically?
Not usually. The level is best treated as location, then confirmed with actual reaction or rejection behavior.
Why does support and resistance feel subjective?
It becomes subjective when traders do not rank levels or define what actually makes a level actionable.
Newer
Pullback trading setups: how to separate healthy retracements from low-quality entries
Older